
这篇文章主要记录,Phaser画中画游戏的制作流程以及制作难点,主要涉及以下几点:项目效果
Phaser横屏适配
Phaser横屏适配沿用Phaser小站的横屏适配方案
注意:一般在preload的时候,就设置横屏了
项目开头,先加入这一段代码;作用是在横屏的时候,让游戏旋转90度1
2
3
4
5
6
7
8
9
10
11
12Phaser.World.prototype.displayObjectUpdateTransform = function () {
if (!this.game.scale.correct) {
this.x = this.game.camera.y + this.game.width
this.y = -this.game.camera.x
this.rotation = Phaser.Math.degToRad(Phaser.Math.wrapAngle(90))
} else {
this.x = -this.game.camera.x
this.y = -this.game.camera.y
this.rotation = 0
}
PIXI.DisplayObject.prototype.updateTransform.call(this)
}
定义一个judgeOrient()方法,在游戏开始的时候和手机方向旋转的时候调用1
2
3
4
5
6
7
8
9
10
11
12
13
14
15judgeOrient () {
if (this.game.scale.isLandscape) {
this.game.scale.correct = true
this.game.scale.setGameSize(
this.game.optionsWidth,
this.game.optionsHeight
)
} else {
this.game.scale.correct = false
this.game.scale.setGameSize(
this.game.optionsHeight,
this.game.optionsWidth
)
}
}
搭建图片
搭建图片之前,需要用ps测量几个尺寸:
- 每一张图片与下一张图片衔接区域的大小
- 衔接区域的坐标
测量好之后,就可以开始计算几个值:
- rate 图片缩放的大小
- anchorX和anchorY 缩放中心的坐标
- areaX和areaY 缩放区域的坐标
1 | rate: 1920 / 178 / 2, |
这里需要注意几点:
- 这里的游戏逻辑是,把图片从最后一张开始添加(因为后面添加的会叠在上面)。
- 每次添加都需要把图片放大指定的尺寸,使得图片一开始可以跟前面一张图片重合。
- 放大之后,需要设置一下图片的缩放中心,这个中心需要经过一些计算
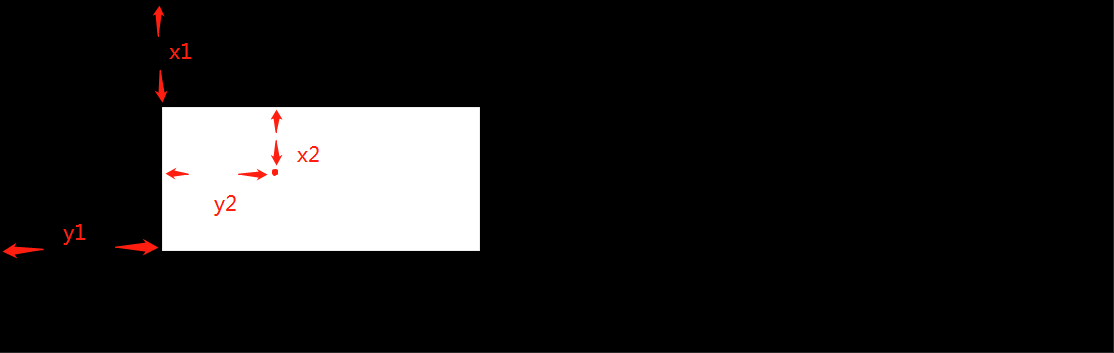
如上图,需要保证x1/y1 = x2/y2,根据这个中心点进行缩放,图片缩放到原始大小的时候,才能正好铺满屏幕
长按效果
有了这些数值之后,可以开始制作长按效果,先创建一个长按按钮,绑定两个方法,一个是按下,一个是释放1
2
3
4
5
6
7
8
9
10
11
12
13// press btn
this.press = this.game.add.sprite(
this.game.optionsWidth / 2,
this.game.optionsHeight * 0.8,
'press'
)
this.press.scale.set(0.7)
this.press.anchor.set(0.5)
this.down = false
this.press.inputEnabled = true
this.press.events.onInputDown.add(this.onDown, this)
this.press.events.onInputUp.add(this.onUp, this)
通过一个变量this.down = true,来控制这个长按效果1
2
3
4onDown () {
...
this.down = true
}
在phaser的update中,判断如果this.down为true的话,就开始执行缩放动画,动画逻辑是:
为每一张图片的缩放动画,都设定一个区间,在这个区间内,执行动画,否则,不执行;
1
2
3
4
5if (this.p2.width > 0 && this.p1.width <= this.game.optionsWidth) {
// 当前图片宽度大于0 (不能让图片无限缩小)
// 前一个图片的宽度小于当前屏幕宽度(前一个图片的宽度小于当前屏幕宽度的时候,当前图片就已经会出现在画面中,这时候就需要对当前图片进行缩小)
...
}核心缩放效果,就是改变当前图片的宽高
1
2
3
const rate = 0.01
nowPage.width = nowPage.width * (1 - rate)
nowPage.height = nowPage.height * (1 - rate)
但是除此之外,需要增加一些必要的判断,首先是判断是否为最后一页,如果是最后一页,就不用缩放了,跳到最后的场景1
2
3
4
5
6
7
8
9
10
11
12
13
14
15
16
17
18if (nextPage === 'end' && nowPage.width <= this.game.optionsWidth * 1.1) {
nowPage.prevPage.destroy()
nowPage.tween = this.game.add.tween(nowPage).to(
{
alpha: 0
},
500,
null,
true,
0,
0
)
nowPage.tween.onComplete.add(() => {
this.game.state.start('end')
}, this)
} else if (nextPage !== 'end') {
nextPage.prevPage = nowPage
}
然后,当当前图片宽度已经小于屏幕大小,后面一张图片已经在缩放的时候,需要先把上一个图片销毁掉;因为这个时候,上一个图片已经很小,没必要再去缩放
并且,把当前图片的坐标和缩放中心调整为跟后面一张图片相匹配:这样做目的是因为一开始创建图片的时候,由于图片被放大,所以清晰度不高,如果直接出现在页面上,用户体验不好。所以需要保留之前的一张图片,跟当前的图片一起缩放,这样清晰度就能够保证1
2
3
4
5
6
7
8
9
10
11
12
13
14
15
16if (
nowPage.width <= this.game.optionsWidth &&
nextPage.visible === false &&
nextPage !== 'end'
) {
// this.currentPage = nextPage
if (nowPage.prevPage) {
nowPage.prevPage.destroy()
}
nowPage.position.set(
nextPage.anchor.x * this.game.optionsWidth,
nextPage.anchor.y * this.game.optionsHeight
)
nowPage.anchor.set(nextPage.anchor.x, nextPage.anchor.y)
nextPage.visible = true
}
结束页面
结束页面难度不大,不过要注意的是分享的弹窗需要最后再添加,不然会被前面的页面挡住;还有就是结束层是一个group,点击动作需要使用onChildInputDown的方法1
this.shareGroup.onChildInputDown.add(this.closeShare, this)